DFMA - Assembly Mistake Proofing
- In this section, an analysis is done to see how Black & Decker used certain techniques to ease, and mistake-proof the assembly of the Li2000 screwdriver. These techniques are used by engineers when designing and building any product, or when trying to fix and improve certain aspects of an already built product.
Prevention
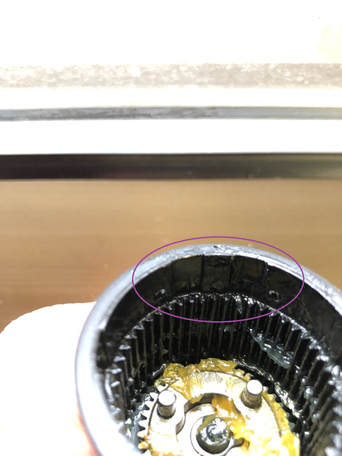
When assembling the screwdriver, the motor has to be inserted with the first gear set, into the ring gear housing and second gear set at the head of the screwdriver. To secure it in place, the motor has to be fully inserted inside the ring gear, and then the U-pin has to be inserted from outside the ring gear. Although there are pinholes on either side of the screwdriver, B&D have completely fool-proofed the design so that it is impossible to insert it the wrong way.
|
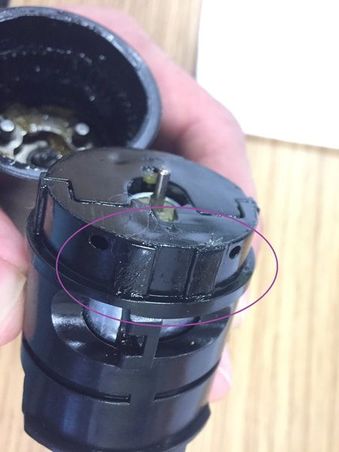
These two notches, circled on the left in purple, make it so that there is only one way the Li2000 can be assembled. The opposite side of those notches have one smooth notch, which prevents the notched side from going into the smooth side.
On the right, the raised notches on the motor housing are circled to show the orientation it would have to be in to be inserted correctly. The other side would not fit. |
|
Prevention
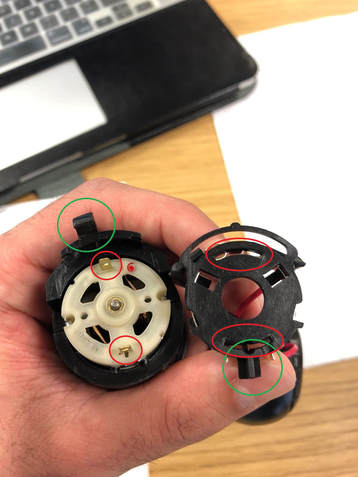
Another way in which B&D implemented DFMA in their design can be seen from the shape of the motor housing at the opposite side of the gear train. Specifically in this housing, there is a black piece that juts outward. This can be shown below, circled in green:
Another way in which B&D implemented DFMA in their design can be seen from the shape of the motor housing at the opposite side of the gear train. Specifically in this housing, there is a black piece that juts outward. This can be shown below, circled in green:
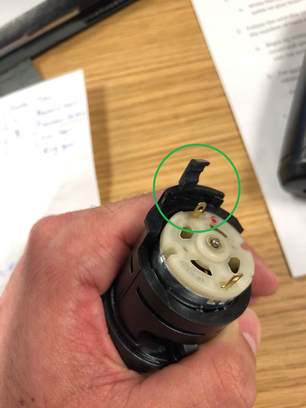
This piece, similarly to the notches mentioned in the previous example, also prevents one from attaching the rest of the circuit with the handle to the front portion of the screw driver in the wrong way. It makes it so that there is only one way to attach the handle part with the forward reverse switch mechanism, because that black piece will be blocking it from being attached incorrectly.
This can be seen by the picture on the right. This picture shows the two faces that will be attached together and in their right orientation. As shown in the picture, the black piece is not in the way because it is oriented correctly. If either face was rotated the other way, the black piece would prevent the assembly since the other face also has a similar black piece (which will be discussed later on). Below shows how the two parts get assembled correctly |
|
The shape of the black housing of the motor also fool-proofs the assembly of the outer orange housing once the handle is attached. As seen from below, there can only be one orientation to attach and screw on the orange housing. The tiny black piece mentioned earlier fits snugly around the screw hole, and the rest of the black housing has specifically placed grooves which allow for the orange outer housing to fit only if inserted correctly into the grooves.
|
|
|
|
|
Facilitation
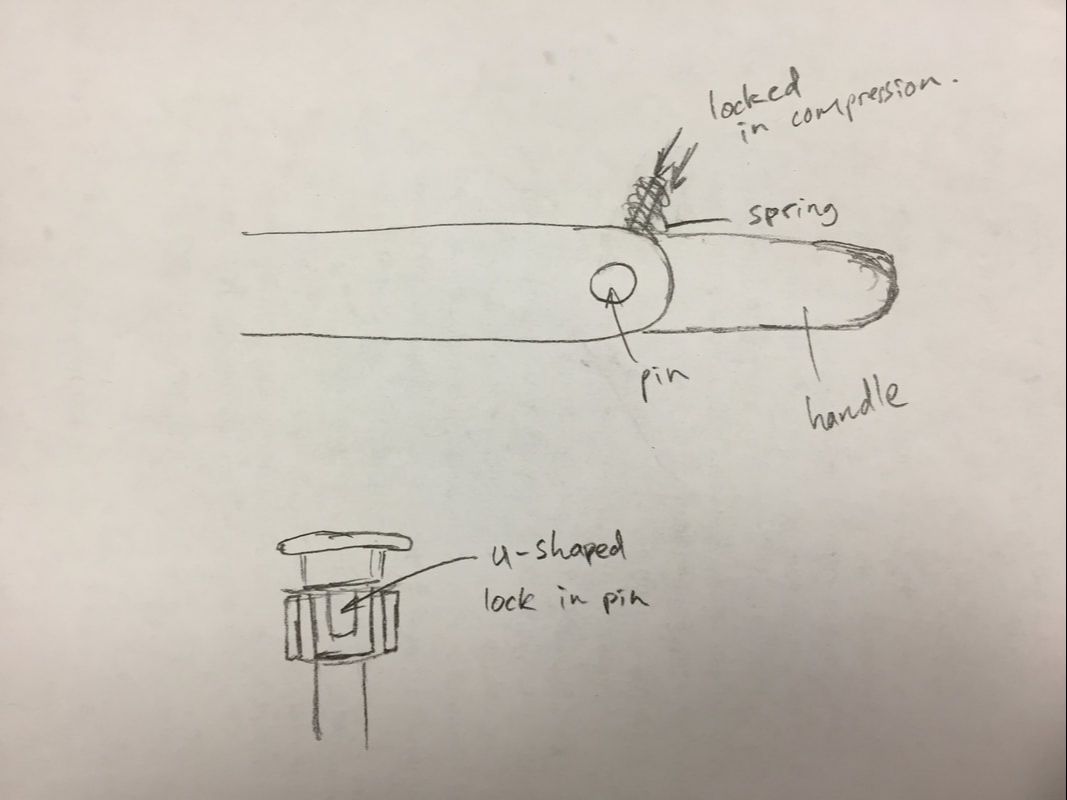
When analyzing the pivoting mechanism, we can see that B&D cleverly implemented DFMA in the form of facilitation. The mechanism works with a pin that can be pushed in to change the angle of the pivot, and then auto-locks upon release. This works with a smart use of a spring around the pin. Whenever the pivot is locked in place, it is because the pin is not pushed down. The reason for that is the spring that sits around the pin. It is always in compression within the mechanism, and so, it pushes on the head of the pin to auto-lock it at all times. When a new angle wants to be used, the pin is simply pushed in and the spring withstands further compression until released. Then it auto-locks the handle in place again. |
|
Functionality Explained
Forward and Reverse Lock Switch
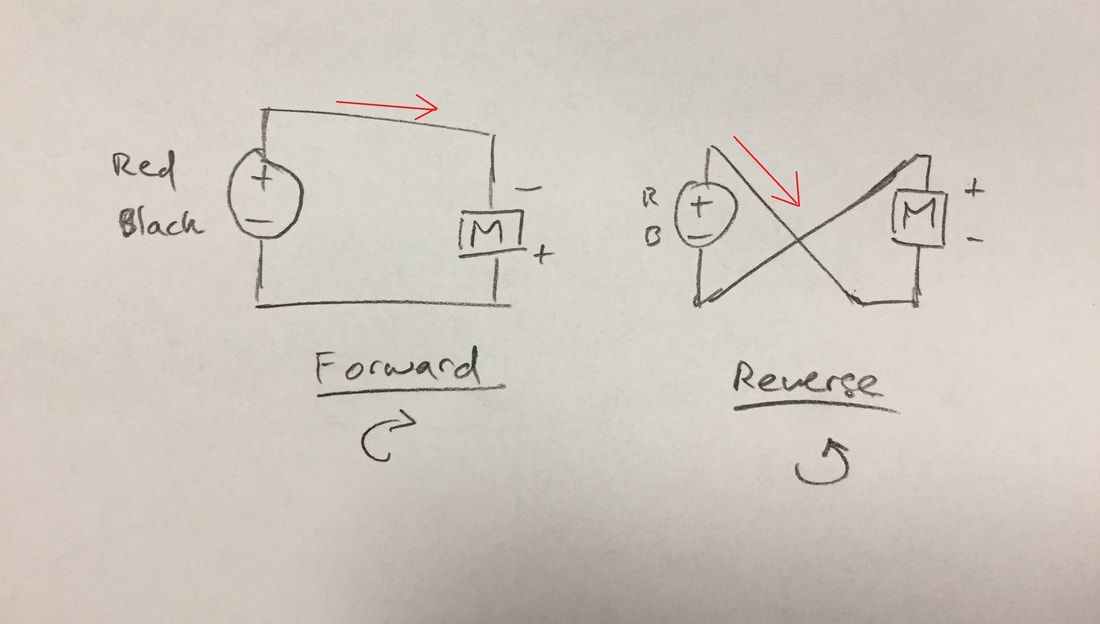
For the forward and reverse switch to work, the power from the battery has to be able to run through the motor in two different directions. The power from the battery in the handle already has two terminals, giving it its specific polarity. The motor has two neutral terminals that can be assigned polarity when in contact with the battery wires. To have the motor able to take current in both directions, B&D designed the forward and reverse switch to rotate the motor in two orientations so that the terminals can come in contact with the current from either direction depending on the orientation.
- In this section, three different mechanism or functions of the Li2000 screw driver are explained clearly and with diagrams.
Forward and Reverse Lock Switch
For the forward and reverse switch to work, the power from the battery has to be able to run through the motor in two different directions. The power from the battery in the handle already has two terminals, giving it its specific polarity. The motor has two neutral terminals that can be assigned polarity when in contact with the battery wires. To have the motor able to take current in both directions, B&D designed the forward and reverse switch to rotate the motor in two orientations so that the terminals can come in contact with the current from either direction depending on the orientation.
|
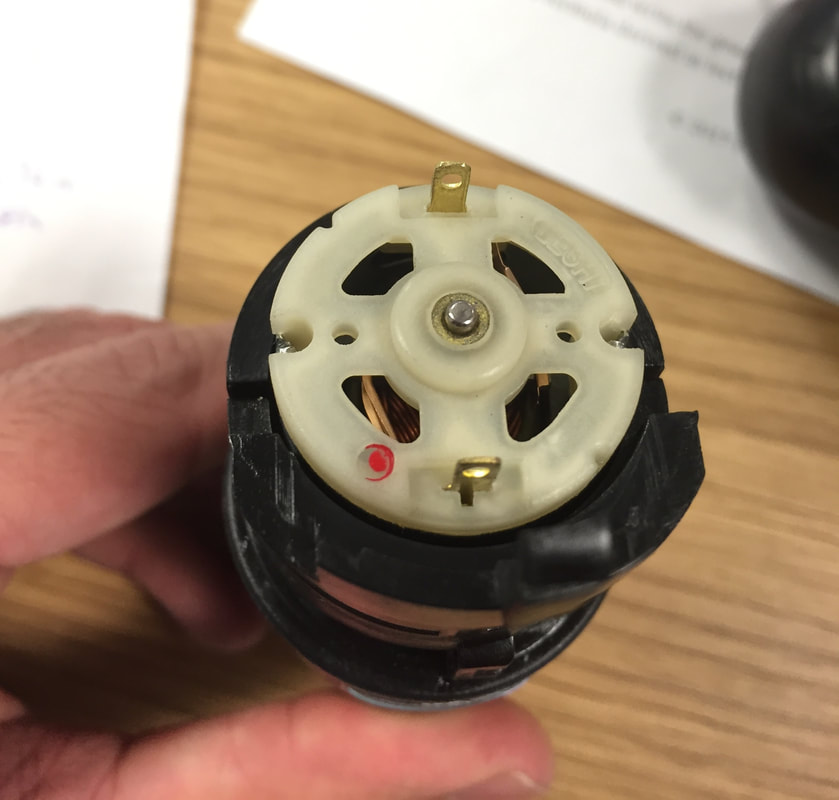
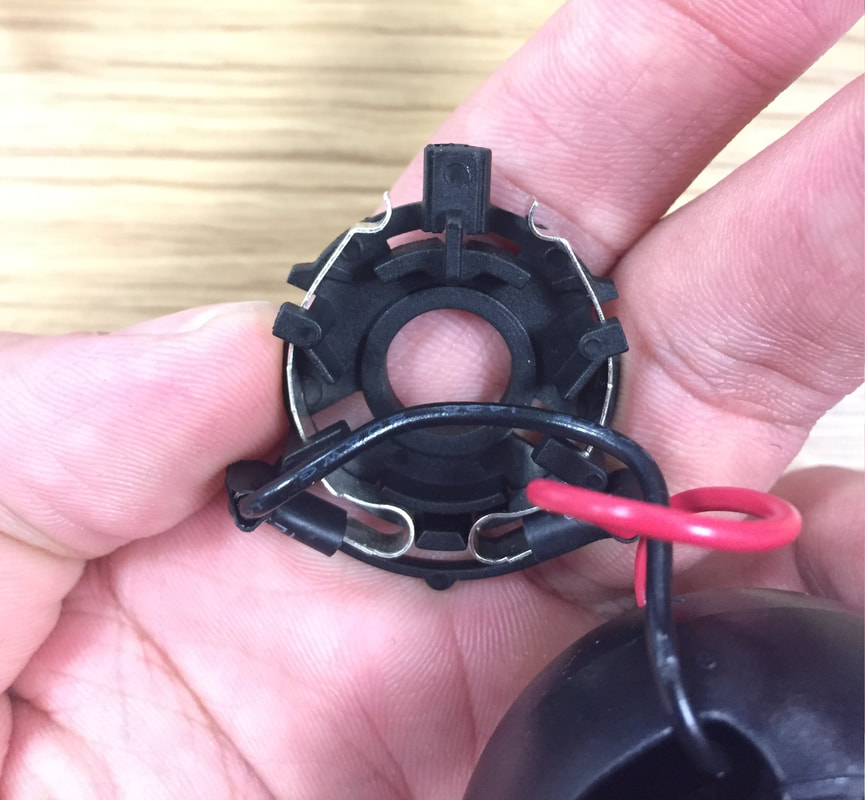
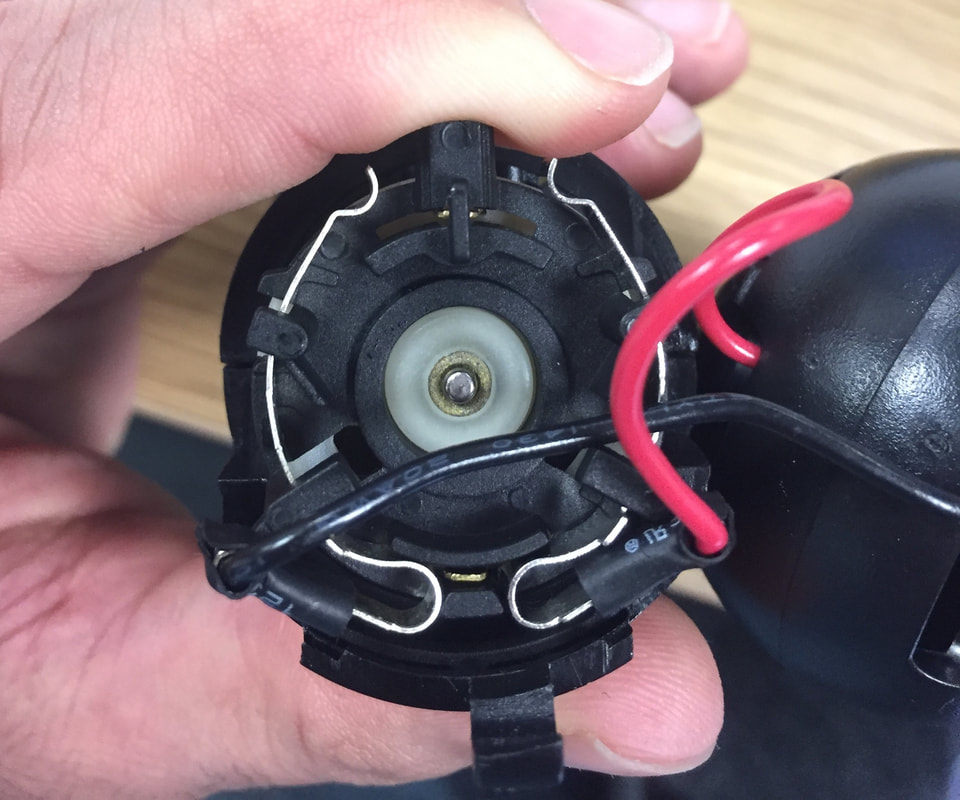
a In the slideshow on the left, the first image shows the full circuit from the battery to the motor, with the switch in a neutral or "off" position. Here we see the red and black wires from the battery, connecting to the two conducting metal pieces on the left and right of the motor assembly. Through that, we can see the two motor terminals at the center top and bottom of the motor. The very top black piece of plastic connects to the switch button and rotates the entire plate with the two conducting metal pieces.
In the second picture, we see a new orientation with the switch in the reverse position (plate rotated to the right). As shown in the picture, the top terminal of the motor can now be connected to the black wire, and the bottom motor terminal is connected to the red wire. If the red wire is the positive terminal of the battery, then the current is running from the red wire, through the motor, and back to the battery through the black wire. The third image shows the second orientation of the plate to the motor, in which the current flows the opposite way. It still starts through the red wire because that positive end is fixed by the battery, but then it goes through the top of the motor terminal, through the motor, and back through the black wire from the bottom motor terminal. The last image which is on the left, shows a basic circuit diagram of how this process works. The battery is on the left side with the red and black terminals indicated as positive and negative. The current flows through the circuit and to the motor giving it its direction. |
Tool Handle Pivot
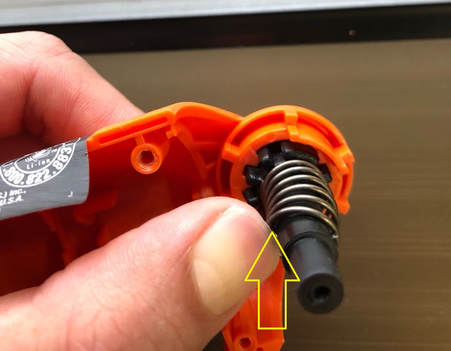
As mentioned earlier, the handle which holds the battery can pivot and provide different angles of orientation to the rest of the screwdriver assembly. To do this requires a pin and spring mechanism that was talked about already. Below shows a slideshow of the pin, entered through the outer orange housing.
As mentioned earlier, the handle which holds the battery can pivot and provide different angles of orientation to the rest of the screwdriver assembly. To do this requires a pin and spring mechanism that was talked about already. Below shows a slideshow of the pin, entered through the outer orange housing.
|
|
When the pin is pushed all the way in, the teeth are not locked with the teeth of the housing. This can be seen in the second image. When it is not locked, the handle is free to rotate with the pin that is fixed in place with the handle. The user can choose their desired rotation, and then release the button which will let the spring force take over and push the pin back towards the orange teeth, locking it in place again. This lock happens because of the shape of the teeth on the pin-- specifically the one set of teeth that are shaped like a U.
|
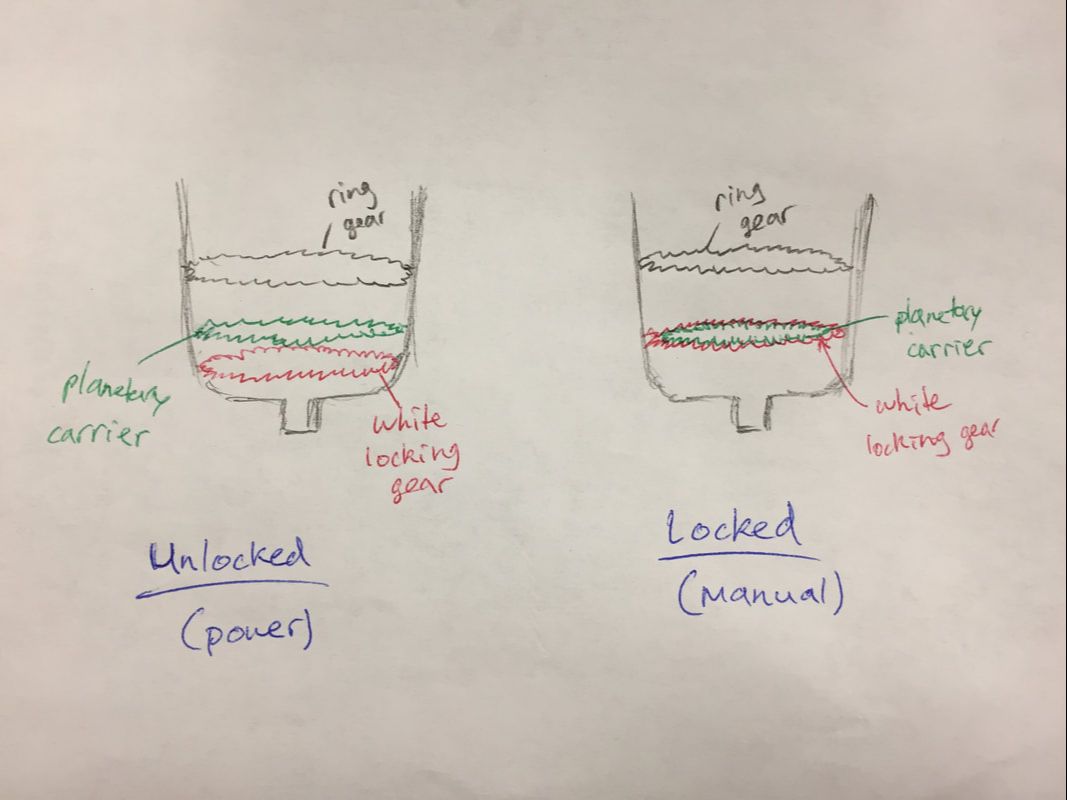
Power/Manual Option
The Black & Decker Li2000 has a built-in manual option that is very simple to explain. It works by locking the bottom planetary carrier in place so that the entire gear set can't turn. To do this, an outer set of teeth are lifted up in place to mesh with the teeth of the planetary carrier from the bottom when the screwdriver head is rotated to the manual position. When rotated back to the power position, the teeth simply drop back down, allowing for the gear train to function normally.
The Black & Decker Li2000 has a built-in manual option that is very simple to explain. It works by locking the bottom planetary carrier in place so that the entire gear set can't turn. To do this, an outer set of teeth are lifted up in place to mesh with the teeth of the planetary carrier from the bottom when the screwdriver head is rotated to the manual position. When rotated back to the power position, the teeth simply drop back down, allowing for the gear train to function normally.
|
|
|
What I Learned
This project was really interesting for me and I enjoyed it a lot. I am extremely happy to have familiarized myself with a CADing software and I feel like that will be extremely useful to me in my future. Having had this experience of deconstructing and analyzing the Li2000, I feel like I am better at understanding how engineers design everyday products to meet standards of excellence for the average user. Black & Decker did incredibly well to make this product and their epicyclic gear train function well, and it was nice to have analyzed this specifically. It was interesting to see how much work and thought went into a simple screwdriver.
This project was really interesting for me and I enjoyed it a lot. I am extremely happy to have familiarized myself with a CADing software and I feel like that will be extremely useful to me in my future. Having had this experience of deconstructing and analyzing the Li2000, I feel like I am better at understanding how engineers design everyday products to meet standards of excellence for the average user. Black & Decker did incredibly well to make this product and their epicyclic gear train function well, and it was nice to have analyzed this specifically. It was interesting to see how much work and thought went into a simple screwdriver.
